


|
|
|
�� Purging a Desktop Epson Printer With Sponge Filled Cartridges �� |
| �� |
|
Purging Procedure - If you have just installed a new archival or Quadtone cartridge you must purge the Epson print head of all of the old, non-archival, ink before you can begin to print with the full archival effect. The print heads in the Epson 200/400/440/500/600/640/740/800/850/860/900/1160/1520/Photo/Photo 700/Photo EX/Photo 750/Photo 1200 printers hold about 3 to 5 pages worth of ink. Always run a Nozzle check before printing. Even if you get a perfect nozzle check on your first try after putting in a new cartridge, run at least one or two head cleaning cycles. This will prevent any excess ink from over filling the print head. After the cleaning cycles, use the purging test patterns below to purge your system of the old ink. After printing about 5 (8.5x11) pages of this pattern, 98% of the old ink will be gone. The rest will come out slowly and may take as many as 20 or more pages, but at the 98% point you will see good results. If you have an Epson 3000, 5000 or 9000, see below.
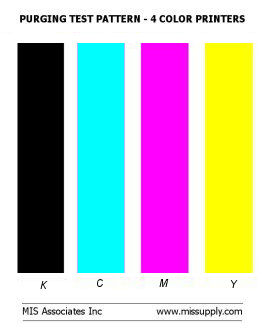 �� ��
Download purge.zip (59kb) to get these test patterns and others. To expand the file you will need PKZip for PC's or Stuffit for Mac's Do not attempt to purge your print head by injecting water, alcohol or Windex or anything else directly into the print head. It can lead to problems if not done exactly right. The above purging procedure is the safest and most reliable purge method for the sponge filled cartridges. If you were previously using Lysonic or Luminous ink, then you must first purge your printer using either a Lysonic/Luminous or a MIS cleaning cartridge. The Lysonic/Luminous ink is not chemically compatible with Epson ink or MIS ink. The cleaning fluid will get rid of the incompatible ink before the MIS ink is introduced. Follow the same procedure as above when using the cleaning cartridges. If you are changing from Epson color ink to MIS Quadtone ink you can use the cleaning cartridge to observe the purging progress. As you begin to print with the clear fluid in the cleaning cartridge, you will see the old color ink start to disappear as you print your purge patterns. If you still have color or black left in the print head after 5 pages of each color, you can continue to print until all traces of color or black are gone. This is not really necessary, because after you remove the cleaning cartridges and install the Quadtone cartridges, you will have to run the purge procedure again to get the cleaning fluid out of the print head. However, sometimes it is comforting to know that all the color is gone, but it is extra work. Flipping back and forth from Archival to Quadtone or from Archival to Epson ink can be easily done for the smaller Epson printers by following the above purge procedure. However, once you remove the cartridge from the printer, do not put the partially used cartridge back in the printer again. It can cause you to loose prime on the print heads. It is best to use up all of the ink in a cartridge before switching over to another one. So, switching back and forth can be done, but you must use new cartridges each time. (We are not saying this to increase cartridge sales, it is to keep you out of trouble). If you want trouble free printing, you should plan on dedicating the printer to just one type of ink. Minor banding, excessive bleeding and color problems can occur if you do not do a good job of purging out the old ink. |
|
�� Purging an Epson 3000 �� |
|
| �� | |
| To clean out an Epson 3000 or to change ink types, follow
these steps:
|
|
|
�� Purging an Epson 5000 �� |
|
| �� | |
|
The 5000 does not have a transport procedure (line dump and recharge) like the 3000 and 9000
printers. An internal valve is used to prevent ink leakage during transport instead. There
is an initial charge procedure that can be used for head cleaning, plus other methods that
help clear out old inks an restore missing nozzles. This information comes from the Epson
Service Manual. Most all of the Epson Service manuals can be obtained from this site,
www.otd.com.ua.
To assist the owners of 5000 printers, we have put a few pages of the service manual together into a zip file. These instructions explain how to do cleaning cycles and the meaning of the front panel lights, and controls. It also contains instructions on how to reset the waste ink counters via the use of the Epson adjustment program (also included). Download zip file. |
|
|
�� Head Cleaning for Epson 7000 �� |
|
|
PURGING ENTRAPPED AIR BUBBLES AND FROTH ON AN EPSON 7000 PRINTER When installing a new ink or a Continuous Flow System on a 7000, very often air gets trapped in the plastic tubing running from the heads to the cartridges within the printer. As you purge the old ink and charge the new ink, the printer has been known to let the ink build up into a frothy mixture. Obviously this plays havoc with your efforts in trying to get a good nozzle check. Should this happen, do not panic. Let the printer sit overnight and then do the following: This won't work without paper loaded. Paper can't be properly loaded in the service mode. Make sure that the paper is loaded properly before starting. It will not work with 8-1/2 x 11 paper, so load something larger. To access service mode, turn the printer off. Then turn it back on WHILE holding down the BOTTOM three buttons. This will initiate the test mode.
|
|
|
�� Ink Purging and Replacement in the Epson 7600 / 9600 �� |
|
|
What you will need:
-1 draining cartridge that came with your printer. Overview: The following procedure works well when purging color inks from the Epson 7600 / 9600 in order to replace them with a B&W ink set. As with any ink changing process, the procedure will burn up ink in the 7600 / 9600, however it is a much faster procedure than simply printing square footage in order to purge the lines and is worth the relatively small amount of waste and cost involved. Unfortunately you may need a replacement maintenance waste ink tank to complete this process due to the amount of ink that is to be drained from the system. A replacement tank must be available before running this procedure. If you don't have a replacment maintenance tank, you can reuse the one in the printer by replacing the absorbent material then resetting the chip on the tank with an MIS SK188 or equivalent chip resetter. Tightly packed cotton balls, terry cloth rags, sanitary napkins or disposable diaper material work well as absorbing material. The cotton balls reduce the splatter of ink. If you use cotton balls, be sure to check the tank often to see if it is filling up. You don't want the mess of an overflow! With the 7600 /9600 there is a maintenance procedure to change from Photo Black ink to Matt Black ink. It involves using the draining cartridge that came with the new printer and a sequence of commands from the printer's keypad. During this procedure you are asked to remove all carts, insert the draining cart and the printer will then go through a draining procedure to remove the black ink from the lines. When this is complete you are asked to return all ink carts to the printer at which time the printer goes through an ink charging action. During this phase of the procedure, all ink lines are charged, pushing ink through all the lines at a fairly rapid pace, not just the black ink, but all 7 inks. It is at this point that you will replace a flush set of carts in place of the ink carts. This will instead put flush liquid into the lines. You will then enter the service mode to do an initial ink fill procedure which will further charge the lines with flush liquid and purge the printer's lines of old ink. Once the lines run clean, you can replace the flush carts with the new ink carts and run the same initial fill procedure until the new ink is fully charged into the lines and dampers. It sounds a little complicated, but is easy after you have done it once or twice. Here are is the step by step process. Steps to Take:
|
|
|
�� Quick Ink Change Procedure for the Epson 4000 and 7600 �� |
|
| �� | |
|
These two procedures were forwarded to us by a customer that has both of these printers. The claim
is that, if this is done properly, that flushing the printer with cleaning fluid can be avoided.
Follow this procedure for changing the ink in an Eposn 4000. Follow this procedure for changing the ink in an Eposn 7600 or 9600. These procedures are new (Mar 2005). Let us know if you have any problems or issues in using them. |
|
|
�� Purging an Epson 9000 �� |
|
| �� | |
|
Because of the width of the 9000, there is a lot of ink contained in the lines between
the print head and the cartridges. All of the old ink must be removed before the MIS Archival
or Quadtone ink will work properly. To clean out an Epson 9000 or to change ink types,
use this procedure to purge the machine. Click here to view the
procedure. Let us know if you find any problems
with it.
Basically the procedure is used to dump the ink in the lines and refill them with cleaning fluid. Once the cleaning fluid is in place, you must print each color until only a trace of color is left. This may take quite a few prints. What a trace of color is, is up to your judgment. You want to get at least 90% of the old ink removed, but because it is a serial dilution process, it does take time for this to happen. When you are satisfied you have reached the 90% + point, re-run the purging procedure to install the MIS Archival or Quadtone inks. Then, you will have to print more pages to get full strength ink. Yes, it is a long process, so don't plan on switching back and forth everyday. If you need assistance give us a call at 248-690-7612. A word of caution. If you are refilling your own cartridges, do not skip the last step where you remove all excess air from the cartridge. If air gets in the lines, you will get banding and skipping and you will not be able to get a perfect nozzle check, no matter how many cleanings you run. If you think you have this problem, repeat the last step on the refilling instructions where you pull back on the syringe with the cartridge in an upright position. This will get the air out of the cartridge. |
|
